79
A particularly fine and scarce Second War 'immediate' Second Battle of El Alamein D.C.M.,...

Description
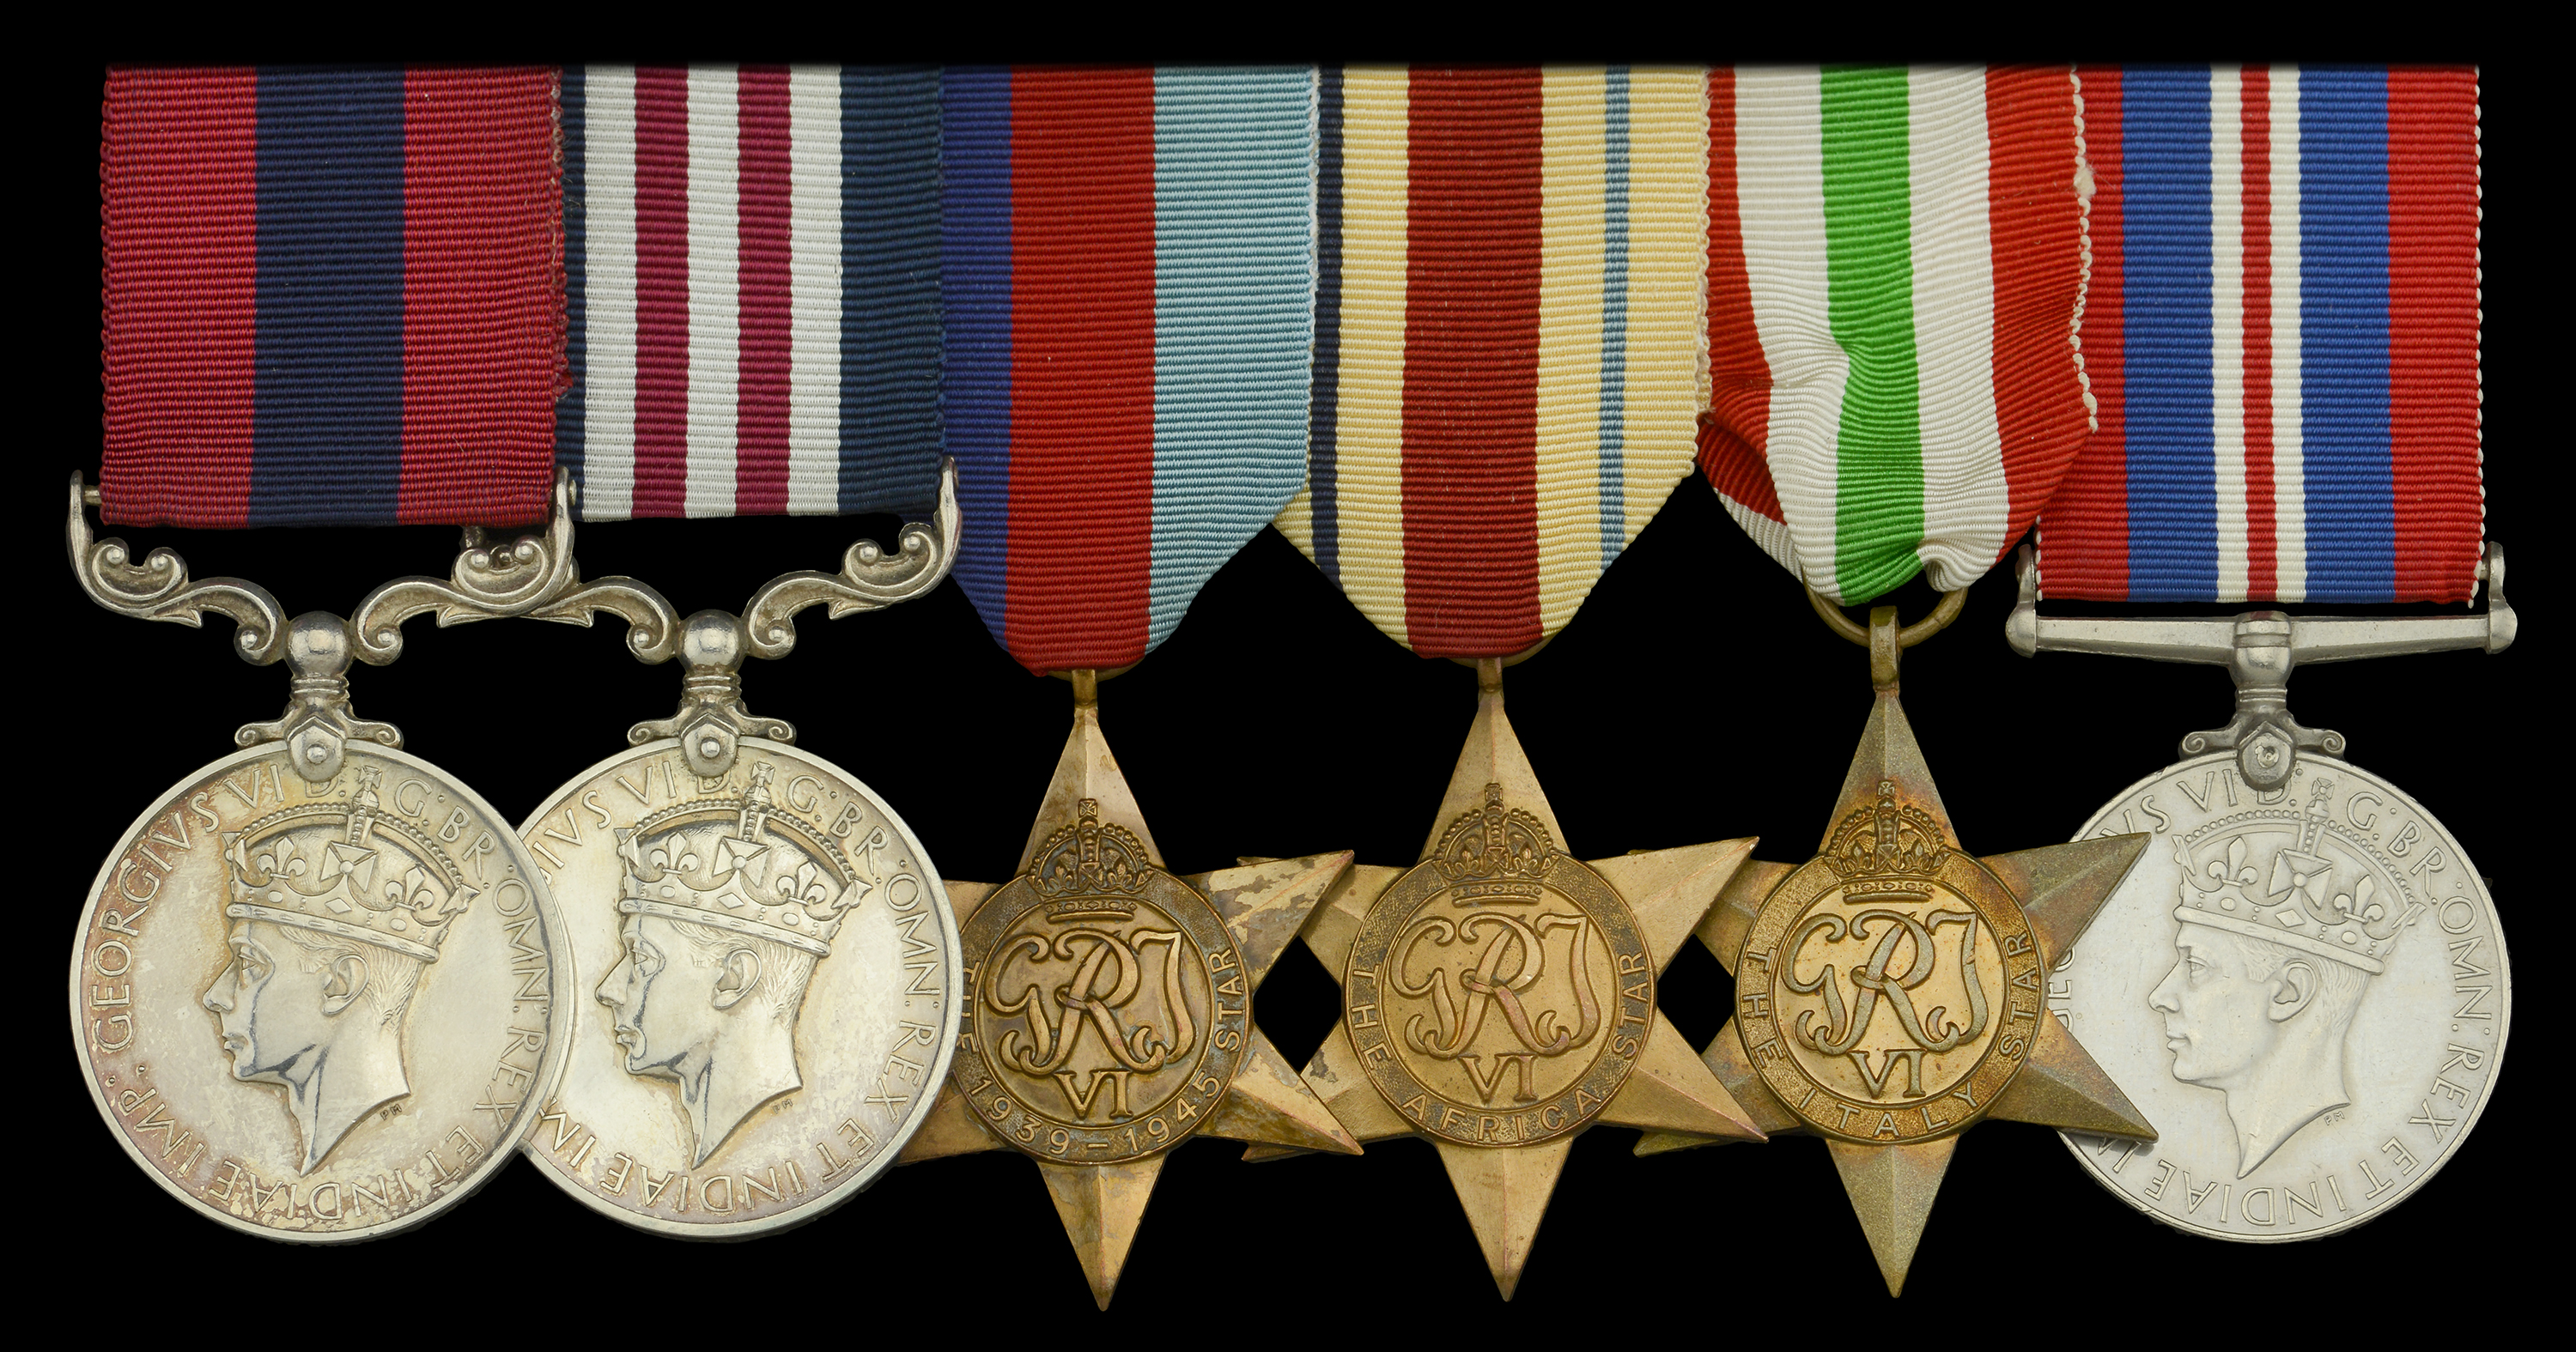
A particularly fine and scarce Second War ‘immediate’ Second Battle of El Alamein D.C.M., ‘Western Desert’ M.M. group of six awarded to Sergeant G. F. Sparks, 12th Royal Lancers, ‘a hoary and much-bemedalled veteran’ who distinguished himself as a Troop leader of armoured cars throughout the desert and into Italy, surviving multiple engagements with bigger tanks and half-tracks, and often coming out on top - knocking out vehicles and taking prisoners along the way Distinguished Conduct Medal, G.VI.R. (549913 Sjt. G. F. Sparks. 12-L.); Military Medal, G.VI.R. (549913 Sjt. G. F. Sparks. 12-L.); 1939-45 Star; Africa Star; Italy Star; War Medal 1939-45, with named card box of issue for D.C.M., generally good very fine (6) £5,000-£7,000 --- D.C.M. London Gazette 25 February 1943: ‘On 2.11.42 Sgt Sparks was commanding a Troop of armoured cars. A car of a Troop on his left had been knocked out by a 50 mm A/Tk gun, and the same gun had also hit Sgt Sparks' second car. Sgt Sparks proceeded alone to try and locate this gun. As he advanced over a slight rise, he saw a M.13 tank coming across towards our infantry positions. He engaged the tank with his 2 pdr, and it tried to turn back, but was hit and stopped. He then saw a large half-tracked vehicle come up to the tank. This he engaged, and knocked out with his first shot. Both enemy crews "baled out" and stretcher parties were seen taking the wounded away. Strong enemy infantry positions and mines in front of him prevented him from advancing and capturing the crew. Sgt Sparks then went back, and with the assistance of a 6 pdr A/Tk gun, the tank and half-tracked vehicle were finally and completely destroyed. Sgt Sparks has shown outstanding powers of leadership during these operations.’ M.M. London Gazette 18 February 1943: ‘During the period 12.6.42 to 16.6.42, the Squadron was in action South of Acroma in support of 22 Armd. Bde. Sgt Sparks, as Troop Leader of the right flank Troop of the Squadron line showed great determination and bravery in carrying out his reconnaissance duties despite heavy shellfire from both enemy artillery and tanks. Throughout the operation he maintained touch with the South African Division on the right and was instrumental in passing much valuable information between that Division and 1st Armd. Division. During the last 9 months this NCO has proved himself on all occasions a cool, resourceful and fearless Troop Sergeant, having actual command of a Troop during the last five months.’ George Frederick Sparks initially served with the 12th Royal Lancers, Royal Armoured Corps as part of the 1st Armoured Division, 10th Corps in the Western Desert. He was awarded the M.M. for his gallantry in action South of Acroma, 12-16 June 1942: ‘With the failure to eliminate the enemy bulge, the initiative passed from the Eight Army to the enemy, and when ‘A’ Squadron relieved ‘C’ Squadron on the morning of 8 June the armoured-car line of observation was back north and west of the Knightsbridge Box, the Royals on the left, the South Africans on the right, and ‘A’ squadron in the centre with three troops up, one in reserve, one acting as link with the 2nd Armoured Brigade, Squadron H.Q. being with the 22nd Armoured Brigade. For a moment the fighting in the north died down as Rommel concentrated on the destruction of the gallant garrison at Hacheim. Then on the night of 10-11 June Hacheim was evacuated, and the enemy armour pushed rapidly northwards on Acroma and El Adem, opposed by what was left of the 1st Armoured Division and the other tank formations which were concentrated under Major-General Lumsden to cover the evacuation of the Gazala boxes. By 13 June ‘A’ Squadron was back on a line of observation along the escarpment above Acroma. Early reports by 5 Troop that tanks were trying to move down the escarpment to its east led to a successful counter-attack, but the evacuation of the Knightsbridge Box and a disastrous attack by the 1st Armoured Division which ran on to a screen of 88’s opened the way to the north, and by nightfall all patrols had been pushed back from their positions. This withdrawal, on an east and west line in front of Acroma, continued throughout the fourteenth. That night, however, it was clear that the battle of the Cauldron was irretrievably lost. All troops were called in and ‘A’ Squadron marched by night through the minefields of Tobruk, breakfasting next morning at full strength just outside the eastern perimeter. Two days later it joined the Regiment at Capuzzo.’ (History Of The XII Royal Lancers by P. F. Stewart, M.C., refers) The 12th Lancers were withdrawn from the desert for a refit in September 1942, regrouping at Ruweisat Station on 21 October 1942. From there their armoured cars were to be engaged with the 1st Armoured Division, 10th Corps as part of the Second Battle of El Alamein, 23 October. - 11 November 1942. It was during the latter that Sparks’ gallantry came to the fore again, 2 November 1942: ‘It had been clear for some time that the original attack would not cut the gap through which the armour was to pass, and from the evening of 26 October Montgomery had been regrouping, creating round the nucleus of the New Zealand Division a powerful composite force whose duty it was to break through the enemy positions at all costs. It had originally been intended to launch this attack in the coastal sector, but the heavy concentrations of the enemy to meet the successful operations of the Australians led to the shifting of the punch farther to the south - a decision which original in a suggestion by Major-General McCreery. In the early hours of 2 November the attack was launched. By dawn the infantry were on their objectives, and the 9th Armoured Brigade advanced to the Rahman track to widen the gap for the 1st Armoured Division. The Regiment [12th Lancers], which had not moved for the last four days and had suffered slightly from bombing, set off at 4 a.m. that morning to its deployment area south-west of Tel el Eisa, and by first light all three squadrons were fanning out in front of the Division. “As dawn broke”, wrote a troop leader [the role Sparks was performing that day], “one’s sensations were very unpleasant. In the haze of dust shapes arose. All of them were hostile in silhouette and only time told which of them were alive, which dead and innocuous. The agony of suspense felt by a troop leader approaching a cluster of enemy tanks or an anti-tank line of up to 20 guns before he could be certain, by the mere fact of his continued existence, of their abandonment can be best imagined. Also one of the unforgettable impressions of such a morning, of advancing over ground which had been fought for and captured only a few hours before, was the indescribable smell of battle, of death, of explosive and burnt material. It was most unnerving.” In this uneasy atmosphere all squadrons were badly held up by anti-tank guns, ‘A’ Squadron losing a car and R.H.Q. being kept continually on the hop by shell-fire. In the afternoon Lt. Abraham, withdrawing over ground he had already traversed, found himself to his amazement in the middle of German position of company strength, complete with anti-tank gun. Thinking quickly he demolished the gun, sprayed the trenches with fire, and finally took the surrender of six officers and fifty-three other ranks, at the same time releasing many British prisoners. For this action he was awarded the M.C. That day the 9th Armoured Brigade was practically obliterated, suffering a personal Calvary on and across the Rahman track, but its sacrifice enabled the 2nd and ...
Auction Details
Shipping
T&Cs & Important Info
Ask seller a question
A particularly fine and scarce Second War ‘immediate’ Second Battle of El Alamein D.C.M., ‘Western Desert’ M.M. group of six awarded to Sergeant G. F. Sparks, 12th Royal Lancers, ‘a hoary and much-bemedalled veteran’ who distinguished himself as a Troop leader of armoured cars throughout the desert and into Italy, surviving multiple engagements with bigger tanks and half-tracks, and often coming out on top - knocking out vehicles and taking prisoners along the way Distinguished Conduct Medal, G.VI.R. (549913 Sjt. G. F. Sparks. 12-L.); Military Medal, G.VI.R. (549913 Sjt. G. F. Sparks. 12-L.); 1939-45 Star; Africa Star; Italy Star; War Medal 1939-45, with named card box of issue for D.C.M., generally good very fine (6) £5,000-£7,000 --- D.C.M. London Gazette 25 February 1943: ‘On 2.11.42 Sgt Sparks was commanding a Troop of armoured cars. A car of a Troop on his left had been knocked out by a 50 mm A/Tk gun, and the same gun had also hit Sgt Sparks' second car. Sgt Sparks proceeded alone to try and locate this gun. As he advanced over a slight rise, he saw a M.13 tank coming across towards our infantry positions. He engaged the tank with his 2 pdr, and it tried to turn back, but was hit and stopped. He then saw a large half-tracked vehicle come up to the tank. This he engaged, and knocked out with his first shot. Both enemy crews "baled out" and stretcher parties were seen taking the wounded away. Strong enemy infantry positions and mines in front of him prevented him from advancing and capturing the crew. Sgt Sparks then went back, and with the assistance of a 6 pdr A/Tk gun, the tank and half-tracked vehicle were finally and completely destroyed. Sgt Sparks has shown outstanding powers of leadership during these operations.’ M.M. London Gazette 18 February 1943: ‘During the period 12.6.42 to 16.6.42, the Squadron was in action South of Acroma in support of 22 Armd. Bde. Sgt Sparks, as Troop Leader of the right flank Troop of the Squadron line showed great determination and bravery in carrying out his reconnaissance duties despite heavy shellfire from both enemy artillery and tanks. Throughout the operation he maintained touch with the South African Division on the right and was instrumental in passing much valuable information between that Division and 1st Armd. Division. During the last 9 months this NCO has proved himself on all occasions a cool, resourceful and fearless Troop Sergeant, having actual command of a Troop during the last five months.’ George Frederick Sparks initially served with the 12th Royal Lancers, Royal Armoured Corps as part of the 1st Armoured Division, 10th Corps in the Western Desert. He was awarded the M.M. for his gallantry in action South of Acroma, 12-16 June 1942: ‘With the failure to eliminate the enemy bulge, the initiative passed from the Eight Army to the enemy, and when ‘A’ Squadron relieved ‘C’ Squadron on the morning of 8 June the armoured-car line of observation was back north and west of the Knightsbridge Box, the Royals on the left, the South Africans on the right, and ‘A’ squadron in the centre with three troops up, one in reserve, one acting as link with the 2nd Armoured Brigade, Squadron H.Q. being with the 22nd Armoured Brigade. For a moment the fighting in the north died down as Rommel concentrated on the destruction of the gallant garrison at Hacheim. Then on the night of 10-11 June Hacheim was evacuated, and the enemy armour pushed rapidly northwards on Acroma and El Adem, opposed by what was left of the 1st Armoured Division and the other tank formations which were concentrated under Major-General Lumsden to cover the evacuation of the Gazala boxes. By 13 June ‘A’ Squadron was back on a line of observation along the escarpment above Acroma. Early reports by 5 Troop that tanks were trying to move down the escarpment to its east led to a successful counter-attack, but the evacuation of the Knightsbridge Box and a disastrous attack by the 1st Armoured Division which ran on to a screen of 88’s opened the way to the north, and by nightfall all patrols had been pushed back from their positions. This withdrawal, on an east and west line in front of Acroma, continued throughout the fourteenth. That night, however, it was clear that the battle of the Cauldron was irretrievably lost. All troops were called in and ‘A’ Squadron marched by night through the minefields of Tobruk, breakfasting next morning at full strength just outside the eastern perimeter. Two days later it joined the Regiment at Capuzzo.’ (History Of The XII Royal Lancers by P. F. Stewart, M.C., refers) The 12th Lancers were withdrawn from the desert for a refit in September 1942, regrouping at Ruweisat Station on 21 October 1942. From there their armoured cars were to be engaged with the 1st Armoured Division, 10th Corps as part of the Second Battle of El Alamein, 23 October. - 11 November 1942. It was during the latter that Sparks’ gallantry came to the fore again, 2 November 1942: ‘It had been clear for some time that the original attack would not cut the gap through which the armour was to pass, and from the evening of 26 October Montgomery had been regrouping, creating round the nucleus of the New Zealand Division a powerful composite force whose duty it was to break through the enemy positions at all costs. It had originally been intended to launch this attack in the coastal sector, but the heavy concentrations of the enemy to meet the successful operations of the Australians led to the shifting of the punch farther to the south - a decision which original in a suggestion by Major-General McCreery. In the early hours of 2 November the attack was launched. By dawn the infantry were on their objectives, and the 9th Armoured Brigade advanced to the Rahman track to widen the gap for the 1st Armoured Division. The Regiment [12th Lancers], which had not moved for the last four days and had suffered slightly from bombing, set off at 4 a.m. that morning to its deployment area south-west of Tel el Eisa, and by first light all three squadrons were fanning out in front of the Division. “As dawn broke”, wrote a troop leader [the role Sparks was performing that day], “one’s sensations were very unpleasant. In the haze of dust shapes arose. All of them were hostile in silhouette and only time told which of them were alive, which dead and innocuous. The agony of suspense felt by a troop leader approaching a cluster of enemy tanks or an anti-tank line of up to 20 guns before he could be certain, by the mere fact of his continued existence, of their abandonment can be best imagined. Also one of the unforgettable impressions of such a morning, of advancing over ground which had been fought for and captured only a few hours before, was the indescribable smell of battle, of death, of explosive and burnt material. It was most unnerving.” In this uneasy atmosphere all squadrons were badly held up by anti-tank guns, ‘A’ Squadron losing a car and R.H.Q. being kept continually on the hop by shell-fire. In the afternoon Lt. Abraham, withdrawing over ground he had already traversed, found himself to his amazement in the middle of German position of company strength, complete with anti-tank gun. Thinking quickly he demolished the gun, sprayed the trenches with fire, and finally took the surrender of six officers and fifty-three other ranks, at the same time releasing many British prisoners. For this action he was awarded the M.C. That day the 9th Armoured Brigade was practically obliterated, suffering a personal Calvary on and across the Rahman track, but its sacrifice enabled the 2nd and ...
Orders, Decorations, Medals and Militaria
Sale Date(s)
Venue Address
16 Bolton Street
London
W1J 8BQ
United Kingdom
General delivery information available from the auctioneer
If you are successful in purchasing lot/s being auctioned by us and opt for the item/s to be sent to you, we will use the following methods of shipment:
Within the UK
If you live within the UK, items will be despatched using Royal Mail Special Delivery. This service provides parcel tracking (via the Royal Mail website) and next weekday delivery (betwen 9am and 1pm). Items delivered within the UK are covered by our insurance company. Heavy and bulky lots will be sent by courier, in discussion with the client.
Outside of the UK
If the item/s being sent are worth under £1000 in total they are sent using Royal Mail’s Signed For International service. This ensures the item must be signed for when it is delivered.
If the item/s being sent are valued at over £1000 in total they will be sent using FedEx. This service allows next day delivery to customers in many parts of the US and parcels are fully trackable using the FedEx website.
Shipping Exceptions
Certain lots such as those containing glass or sharp implements, etc., may not be suitable for in-house shipping within or outside of the UK. Please contact Noonans with any queries.
Important Information
Auctioneer's Buyers Premium: 24% (+VAT)
There is an additional charge of 4.95% (+VAT/sales tax)